


Hanging heavy items on hollow wall surfaces like plasterboard or dry wall can seem daunting. Unlike solid walls, these materials lack the inherent density to hold a standard screw securely under load. This is where cavity wall fixings, specifically hollow wall anchor bolts and screws, come into play. These specially designed anchor systems provide the necessary heavy duty support by expanding behind the wall material, creating a stable and reliable fixing point. Understanding how to choose and use the right wall anchor is crucial for safety and project success. This guide, drawing on years of manufacturing experience in Self-Drilling Anchor Systems and Drilling Tools, will walk you through everything you need to know about heavy duty wall anchors, from different types like toggle bolts and molly bolts to installation best practices, ensuring your fixtures stay firmly in place. Whether you’re a seasoned contractor like Mark Davis or a DIY enthusiast, this comprehensive look at cavity fixings will equip you with the knowledge to tackle any hollow wall anchoring challenge with confidence.
1. What Exactly Are Cavity Wall Anchors and Why Are They Indispensable?
Cavity wall anchors, often referred to as hollow wall anchors or cavity fixings, are specialized fasteners engineered to create a secure mounting point in materials that have a void or cavity behind them. Think plasterboard (drywall, sheetrock), plywood, hardboard, or even some types of plaster and tile installations where there isn’t solid backing like a stud. Standard screws or bolts driven directly into these materials can easily pull out under weight because the material itself crumbles or lacks the grip. A wall anchor solves this problem ingeniously.
These anchor systems are indispensable because modern construction frequently utilizes hollow wall techniques for interior partitions. Hanging anything heavier than a small picture frame – like shelves, mirrors, cabinets, TV mounts, or bathroom fixtures – requires a heavy duty solution that distributes the load over a wider area behind the wall surface. Without a proper hollow wall anchor, you risk not only the mounted item falling but also significant damage to the wall itself. They provide the necessary strength to support the weight that the hollow wall material alone cannot handle.
2. How Do Hollow Wall Anchors Create Such a Strong Hold?
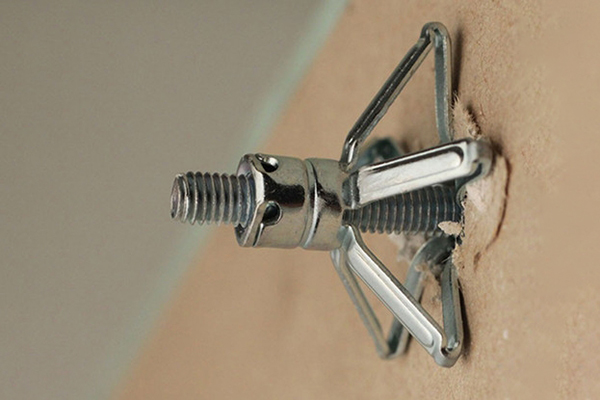
The magic of a hollow wall anchor lies in its ability to expand or brace itself against the back of the hollow wall material. While designs vary, the core principle involves inserting the anchor through a pre-drilled hole into the cavity. Once inserted, a mechanism is activated (usually by tightening a screw or bolt) that causes parts of the anchor to flare out, spread, or toggle open within the void. This creates a much larger surface area bearing the load on the hidden side of the wall, preventing the anchor from pulling back through the hole.
For example, a toggle bolt features spring-loaded wings that fold flat for insertion and then spring open inside the cavity. As the bolt is tightened, these wings are pulled snug against the inner wall surface. A molly bolt (bolt hollow drive wall anchor) works differently; its sleeve crumples and expands outwards behind the wall when the screw is turned. These expansion legs expand tightly against the back of the material. This expansion mechanism ensures the anchor grips securely, effectively sandwiching the hollow wall material between the expanded part inside the cavity and the anchor‘s flange or head on the outside. The expansion legs ensure even load distribution, and the large flange prevents pull-through, resulting in a remarkably strong and reliable heavy duty wall anchor.
3. Exploring the Types: Which Heavy Duty Wall Anchor Suits Your Needs?
Not all hollow wall situations are the same, and neither are the anchors. Choosing the right type is crucial for a secure fixing. Here are some common types of heavy duty wall anchors:
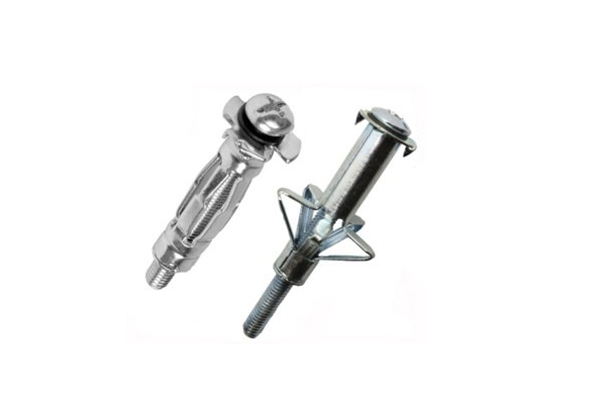
- Molly Bolts (Sleeve Type Anchors): Often made from steel hollow wall material, these are versatile hollow wall anchors. The anchor consists of a removable machine screw that’s threaded into a sleeve. As you tighten the screw, the sleeve expands behind the wall. They come in pointed versions (hollow wall drive) that can sometimes be hammered directly into drywall for light-duty tasks, or non-pointed versions requiring a pre-drilled hole. Molly bolts are great because the screw can be removed and reinserted, useful for items needing occasional removal. Look for zinc plated steel molly bolt hollow drive types for corrosion resistance. We manufacture a range of durable Nut options compatible with these bolts.
- Toggle Bolts (Spring Toggle or Gravity Toggle): These are classic heavy duty hollow wall anchors, particularly the spring toggle bolt variety. A toggle bolt consists of a machine screw and spring-loaded wings (toggle). You drill a hole large enough for the folded wings, insert them, and they spring open inside the cavity. Tightening the screw pulls the toggle wings against the inner wall. They offer excellent holding power, especially for heavier loads, but require a relatively large hole and the bolt must be attached to the fixture before insertion. The toggle bolts and wing nut system provides substantial grip.
- Expansion Anchors: These function similarly to molly bolts but often use plastic or nylon sleeves (plug) that expand when a screw is driven in. While some are light-duty, specific heavy duty expansion anchor designs exist, sometimes called expansion bolt fixings, offering robust performance in materials like plaster or thicker plasterboard.
- Self-Drilling Drywall Anchors: Usually made of metal (heavy duty metal) or hard nylon, these anchors have aggressive threads and a sharp point designed to screw directly into drywall without pre-drilling (though a pilot hole is sometimes recommended for harder plasterboard). A separate screw is then inserted into the anchor. While convenient, their heavy duty capacity is generally lower than molly or toggle bolts. These are a type of self drilling drywall anchors.
Choosing the right anchor depends on the weight of the item, the thickness of the hollow wall material (plaster, dry wall, tile), and whether you need to remove the screw later. Always check the anchor‘s load rating provided by the manufacturer.
4. Toggle Bolts vs. Molly Bolts: When Should You Use Each Anchor Type?
Both toggle bolts and molly bolts (often just called ‘mollies’) are popular choices for heavy duty hollow wall applications, but they have distinct advantages and disadvantages that make them suitable for different situations. Understanding these differences helps ensure you select the best anchor for your specific project.
Toggle Bolts:
- Pros: Generally offer higher load-bearing capacity, especially for ceiling applications or very heavy wall hangings. The wide span of the toggle wings distributes weight effectively across a larger area behind the hollow wall. They work well in walls with larger cavities.
- Cons: Require a larger installation hole compared to a molly bolt of similar holding power. The bolt must be inserted through the item you are hanging before the toggle is inserted into the wall, which can be awkward. If you remove the bolt, the toggle wings fall down inside the wall cavity, meaning you can’t reuse the same anchor point without a new toggle.
- Best Use Cases: Very heavy items (large mirrors, heavy shelving units, grab bars), ceiling fixtures (within load limits), situations where maximum holding power is the priority. Think heavy duty wall anchors for demanding jobs.
Molly Bolts:
- Pros: Require a smaller installation hole. The anchor (sleeve) stays in the wall even if you remove the screw, allowing you to take down and remount the item easily using the same anchor. This is a key benefit of the molly bolt hollow drive wall anchor screw system. The anchor consists of a removable machine screw, making them convenient. Specially designed heavy duty steel hollow molly bolts offer significant strength.
- Cons: May have slightly lower maximum load ratings compared to the largest toggle bolts. The expansion mechanism might not work as effectively in very thin or very thick walls, or walls with obstructions close behind the surface.
- Best Use Cases: Medium to heavy loads (shelves, cabinets, TV mounts, curtain rods), applications where the item might need to be removed periodically, installations in standard thickness drywall or plasterboard. Ideal for hollow wall anchors with screws convenience.
In essence, choose toggle bolts for ultimate strength when a large hole and single-use anchor point are acceptable. Opt for molly bolts for strong, reliable fixing with the convenience of a reusable anchor point and a smaller installation footprint. Both are excellent hollow wall anchors for drywall and plaster.
5. Choosing Wisely: How Do I Select the Right Anchor Screw Size and Strength?
Selecting the appropriate anchor screw size and strength is as critical as choosing the right type of hollow wall anchor. An undersized screw or anchor can lead to failure, while an oversized one might damage the wall or be unnecessarily difficult to install. Here’s a breakdown of factors to consider:
- Load Weight: This is the primary consideration. Determine the total weight of the object you intend to hang. Always choose an anchor and screw combination rated significantly higher than the actual weight to provide a safety margin. Manufacturer packaging usually specifies the maximum load capacity for different wall materials (drywall, plaster, tile). Remember that shear (downward) strength is often different from pull-out (tensile) strength.
- Wall Material and Thickness: The type and thickness of your hollow wall material affect the anchor‘s performance. Anchors have specific grip ranges – the thickness of wall material they are designed for. Using an anchor outside its grip range can compromise its holding power. For instance, a heavy duty steel hollow wall anchor might require a minimum plasterboard thickness to expand correctly.
- Anchor Type Requirements: Different anchor types dictate the screw needed.
- Molly Bolts: These usually come as a complete unit (anchor screws included). The anchor consists of a removable machine screw matched to the sleeve’s thread. You typically use the screw provided. If replacing, match the diameter and thread pitch exactly.
- Toggle Bolts: These also come as a set (bolts and wing nut kit). The bolt length needs to be sufficient to pass through the item being hung and the wall thickness, with enough extra length for the toggle wings to fully open and tighten. The bolt diameter corresponds to the toggle size and load rating.
- Expansion Anchors/Plugs: These often require a separate screw. The anchor packaging will specify the required screw diameter and minimum length. Using the wrong size screw can prevent proper expansion or strip the anchor.
- Self-Drilling Anchors: These require a separate screw after the anchor body is installed. Again, follow manufacturer recommendations for the screw size to ensure it engages the anchor‘s internal thread correctly and provides greater strength to support the load.
- Fixture Thickness: The thickness of the item’s mounting bracket or base must be accounted for when selecting screw length. The screw needs to be long enough to pass through the fixture and fully engage the anchor mechanism behind the hollow wall.
- Number of Anchors: For heavier items, distribute the load by using multiple anchor points. Divide the total weight by the number of anchors to determine the minimum load requirement for each wall anchor, but ensure each anchor could theoretically handle a significant portion of the load for safety. Using a drywall anchors and screws assortment kit can provide options.
Always err on the side of caution. Choosing a slightly stronger anchor or screw (heavy duty) is better than risking failure. Remember, the anchor screws are critical components; ensure they are high-quality, often zinc plated steel, to match the durability of the anchor itself.
6. Installation Masterclass: What’s the Correct Way to Install Hollow Wall Fixings?
Proper installation is key to achieving the maximum holding power of your hollow wall anchor. While specific steps vary slightly between anchor types (toggle bolt, molly bolt, expansion anchor), the general process follows these principles. Let’s use a molly bolt as a common example for drywall or plasterboard:
Mark the Location: Decide precisely where you want to mount your item. Use a pencil to mark the spot(s) on the hollow wall. Use a stud finder to ensure you are drilling into a cavity and not hitting a stud, pipe, or wire.
Drill the Pilot Hole: Select the correct drill bit size as specified by the anchor manufacturer. This is crucial – too small, and the anchor won’t fit; too large, and it won’t grip securely. Drill a clean, perpendicular hole through the drywall or plaster. For plaster tile wall anchors, use a tile/masonry bit at low speed first to get through the tile, then switch to a regular bit if needed for the backing board.
Prepare the Anchor: For a molly bolt, ensure the screw is partially threaded into the sleeve but not fully tightened. For a toggle bolt, thread the bolt through your fixture first, then screw on the folded toggle wings.
Insert the Anchor:
Molly Bolt: Gently tap the anchor sleeve into the drilled hole until the flange is flush with the wall surface. Some hollow drive wall anchor screw types have barbs under the flange to prevent rotation – ensure these engage the wall.
Toggle Bolt: Pinch the toggle wings flat against the bolt, aligning them lengthwise. Push the wings completely through the hole into the hollow wall cavity. You should hear or feel them spring open behind the wall.
Set the Anchor:
Molly Bolt: Tighten the screw clockwise. You’ll feel resistance as the sleeve begins to crumple and expand (expansion legs expand tightly) behind the wall. Keep tightening until the screw feels very snug and secure. Don’t over-tighten, as this can damage the drywall or strip the anchor. The goal is for the expansion legs ensure even load distribution. For reusable types, you can now remove the screw, position your fixture, and reinsert the screw. The anchor consists of a removable machine screw that’s threaded for this purpose.
Toggle Bolt: Pull the bolt slightly outwards to ensure the wings are braced against the inner wall surface. While maintaining slight tension, tighten the bolt clockwise until the fixture is held firmly against the wall.
Mount the Item: If you haven’t already (like with a toggle bolt), position your fixture over the installed anchor(s) and secure it using the appropriate screw(s). Tighten until snug.
Key Tip: Always clean out the drill hole of dust and debris before inserting the anchor. This ensures a better fit and grip. Using the correct tools and following the manufacturer’s specific instructions for your chosen wall anchor is paramount for a safe and heavy duty installation. Consider purchasing an anchors and screws kit for convenience.
7. Beyond Drywall: Can Cavity Anchors Be Used Effectively in Plasterboard and Tile?
Yes, cavity anchors are frequently used in both plasterboard (which is essentially another term for drywall or sheetrock) and walls finished with plaster or tile over a hollow backing. However, there are specific considerations for plaster and tile applications:
- Plasterboard/Drywall: This is the most common application for hollow wall anchors. Most anchor types, including molly bolts, toggle bolts, expansion anchors, and self drilling drywall anchors, are designed primarily for plasterboard. The key is selecting an anchor rated for the board’s thickness and the load weight. Standard drywall anchors and screws assortment kits cover most plasterboard needs.
- Plaster Walls: Traditional lath and plaster walls can be trickier. They often have inconsistencies in thickness and may have wooden laths behind the plaster.
- Drilling: Drilling through plaster can cause cracking. Start with a small pilot bit and gradually increase the size. Use masking tape over the drill spot to help minimize chipping.
- Anchor Choice: Toggle bolts often work well because they can span the laths and brace against the back effectively. Heavy duty steel hollow wall anchors (like robust molly bolts) can also work if the plaster is thick and sound enough for the sleeve to grip and expand properly. Standard plastic plug type anchors might not hold reliably in crumbly plaster. Ensure the anchor‘s grip range accommodates the combined thickness of the plaster and any backing.
- Tiled Walls: Anchoring through tile requires careful drilling and the right anchor.
- Drilling: Use a carbide-tipped or diamond-tipped drill bit specifically designed for tile. Start slowly to prevent the bit from wandering. Apply steady, moderate pressure. Drilling through the tile first and then the backing board (drywall or cement board) is essential.
- Anchor Choice: Once through the tile, the choice depends on the backing material. If it’s drywall or plasterboard behind the tile, standard hollow wall anchors like toggle bolts or specially designed heavy duty steel molly bolts are suitable. The anchor must be long enough to pass through the tile and the backing board to expand in the cavity behind. Ensure the anchor flange sits flush against the tile surface. Plaster tile wall anchors often refer to robust anchor types suitable for this combined thickness. Using anchors with screws to provide greater strength is vital here.
In all cases (plasterboard, plaster, tile), ensure the wall anchor chosen is rated for the load and compatible with the total wall thickness at the mounting point. Always follow safety precautions when drilling, especially checking for hidden pipes or wires.
8. Common Pitfalls: What Mistakes Should Be Avoided with Wall Anchor Bolts?
Using wall anchor bolts and hollow wall fixings correctly ensures a safe and secure mount. However, several common mistakes can compromise the installation’s integrity. Avoiding these pitfalls is crucial:
- Choosing the Wrong Anchor Type: Using a light-duty plastic plug for a heavy mirror or a toggle bolt where a removable screw is needed later. Solution: Match the anchor type (molly bolt, toggle bolt, expansion anchor) to the load weight, wall type (drywall, plaster), and functional requirements.
- Incorrect Pilot Hole Size: Drilling a hole that’s too large allows the anchor to spin or pull out easily. A hole that’s too small prevents proper insertion or can damage the anchor or wall. Solution: Always use the drill bit size specified by the anchor manufacturer. Measure twice, drill once.
- Over-Tightening the Screw/Bolt: This is a very common error, especially with molly bolts and expansion anchors. Over-tightening can strip the anchor‘s thread, damage the hollow wall material (crushing the drywall), or even break the anchor itself. Solution: Tighten the screw or bolt until it’s snug and secure, offering firm resistance. Stop tightening once the anchor feels properly set. Feel the resistance build – don’t force it beyond the secure point.
- Under-Tightening: The opposite of over-tightening, leaving the screw or bolt too loose means the anchor mechanism hasn’t fully expanded or engaged behind the wall, drastically reducing its holding power. Solution: Ensure the anchor is fully set according to its design (wings expanded for toggle, sleeve crumpled for molly bolt).
- Hitting an Obstruction: Drilling into a stud, pipe, or electrical wiring. Solution: Always use a stud finder before drilling into a hollow wall. If you hit resistance unexpectedly, stop and investigate.
- Ignoring Load Ratings: Hanging an item heavier than the anchor‘s specified maximum load capacity. Solution: Always check the manufacturer’s load rating for the specific wall anchor and wall type. Use multiple anchors to distribute weight for very heavy items. Remember that listed ratings are often under ideal conditions.
- Using Damaged or Low-Quality Anchors: Employing bent bolts, stripped screws, or anchors made from inferior materials. Solution: Inspect anchors before use. Purchase anchor bolts and fixings from reputable suppliers known for quality materials like carbon steel or zinc plated steel. As a factory owner, I know that quality control is paramount for anchor reliability. Our Self-drilling Hollow Anchor products undergo rigorous testing.
- Not Clearing Drill Debris: Dust and debris left in the hole can interfere with the anchor‘s insertion and expansion. Solution: Briefly vacuum or blow out the hole before inserting the wall anchor.
Avoiding these mistakes will significantly increase the likelihood of a successful and long-lasting installation using hollow wall anchors and screws.
9. The Quality Question: How Does Anchor Reliability Impact Project Safety and Longevity?
The quality of hollow wall anchors, bolts, and screws is not just a matter of convenience; it’s fundamentally about safety and the longevity of the installation. For professionals like Mark Davis, specifying or using high-quality fixings is non-negotiable, directly impacting project outcomes and client satisfaction. Low-quality anchors present significant risks.
Inferior wall anchor products, often made from cheaper materials or with poor manufacturing tolerances, can fail unexpectedly. This might involve the anchor pulling out of the hollow wall, the screw stripping, the bolt shearing, or the expansion mechanism failing to engage correctly. The consequences range from a fallen shelf or picture frame to catastrophic failure of heavy installations like kitchen cabinets or large TV mounts, potentially causing property damage or serious injury. For construction, mining, and tunneling companies, anchor failure in structural or support applications can have even more severe safety implications.
High-quality heavy duty wall anchors, typically made from carbon steel, zinc plated steel, or robust engineering plastics, offer:
- Reliable Load Bearing: They consistently meet or exceed their stated load capacities, providing strength to support the weight reliably over time.
- Durability: They resist corrosion (especially zinc plated steel molly bolt hollow types) and material fatigue, ensuring a long service life.
- Consistent Performance: Well-manufactured anchors install predictably. Their expansion mechanisms (toggle, sleeve expansion) work as designed, ensuring a secure grip in the cavity wall.
- Compliance with Standards: Reputable manufacturers adhere to international standards (like ISO), ensuring their anchors meet specific quality and safety benchmarks. This is a key concern for procurement officers like Mark.
As a factory owner (Allen from China) with 7 production lines exporting globally (USA, North America, Europe, Australia), we understand this implicitly. Our commitment is to producing Self-Drilling Anchor Systems and Drilling Tools, including a wide range of anchors (Expansion Shell Anchor Bolt, Split rock friction anchor, etc.), using high-quality materials and stringent quality control. This focus ensures that our anchor products provide the reliable, heavy duty performance demanded by professionals in construction, mining, and geotechnical engineering. Investing in quality anchor screws and bolts is investing in safety and peace of mind.
10. Sourcing Smart: What Should Professionals Look for in a Hollow Wall Anchor Supplier?
For professionals like Mark Davis, owner and procurement officer sourcing Self-Drilling Anchor Systems and Drilling Tools, finding the right supplier for hollow wall anchors, bolts, and related fixings is crucial for his business’s success. His preference for cost-effective solutions from developing countries like China and Vietnam is common, but his key concerns – quality, certifications, logistics, payment, and communication – highlight the potential pitfalls. Here’s what professionals should look for:
- Verified Quality Control: The supplier must demonstrate robust quality control processes. This isn’t just about the final product; it includes checks on raw materials (e.g., ensuring carbon steel meets specifications) and manufacturing consistency. Ask about their QC procedures and request inspection reports. Factory audits can be invaluable.
- Certifications: Look for internationally recognized certifications, primarily ISO 9001 for quality management systems. While Mark has encountered certificate fraud, legitimate certifications are still a vital indicator. Verify the certificate’s authenticity if possible. Compliance with specific industry standards (e.g., ASTM, DIN) for anchor bolts may also be relevant.
- Technical Expertise & Support: Even if Mark isn’t a technical expert, his supplier should be. They need knowledgeable sales representatives who can understand technical requirements, answer questions accurately about anchor performance (heavy duty ratings, material specs), and troubleshoot issues. This helps bridge Mark’s knowledge gap and avoids inefficient communication.
- Product Range and Customization: A good supplier offers a comprehensive range, covering various types of hollow wall anchors (toggle bolts, molly bolts, expansion bolt types), sizes (20 pcs screw packs, bulk), materials, and related products (like washers, nuts, drilling tools). Flexibility for customization, if needed, is also a plus.
- Reliable Logistics: Shipment delays are a major pain point. Choose suppliers with proven experience in international shipping to the target country (e.g., USA). They should understand export documentation, packaging requirements, and work with reliable freight forwarders. Clear communication about lead times and shipment tracking is essential.
- Transparent Communication: Open, efficient, and clear communication is vital to overcome language barriers and time differences. Suppliers should be responsive via email and preferably other channels. This addresses Mark’s pain point about inefficient communication.
- Competitive Pricing & Fair Payment Terms: While quality is paramount, pricing needs to be competitive, aligning with Mark’s need for cost-effectiveness. Suppliers should offer clear pricing structures and fair, secure payment terms (e.g., Letter of Credit, TT with reasonable deposit/balance).
- Factory Reputation and Experience: Look for established factories with a proven track record, like ours with 7 production lines and experience exporting to major markets. Attending exhibitions is a good way Mark finds suppliers, allowing face-to-face interaction and initial assessment. Online presence and customer testimonials also offer insights.
By prioritizing these factors, professionals like Mark can build relationships with reliable overseas suppliers, mitigating risks like quality issues, shipment delays, and communication breakdowns, ensuring they receive the dependable hollow wall anchors and bolts their clients require.
Key Takeaways:
- Cavity wall anchors are essential for secure mounting on hollow wall surfaces like drywall and plasterboard.
- They work by expanding or toggle-ing behind the wall material to distribute load over a wider area within the cavity.
- Common types include molly bolts (reusable anchor point, smaller hole) and toggle bolts (often higher load capacity, larger hole, single use). Choose based on load and convenience.
- Always select an anchor and screw rated for the specific load weight and wall thickness. Use the manufacturer-specified drill bit size.
- Proper installation involves drilling a clean pilot hole, inserting the anchor correctly, and tightening the screw or bolt until snug but not over-tightened.
- Heavy duty wall anchors can be used in plaster and tile, but require careful drilling techniques and appropriate anchor selection.
- Avoid common mistakes like wrong anchor type, incorrect hole size, over/under-tightening, and ignoring load limits.
- Prioritize high-quality anchor materials (carbon steel, zinc plated steel) and manufacturing for safety and longevity.
- When sourcing anchor bolts and fixings, look for suppliers with proven quality control, certifications (ISO), technical support, reliable logistics, and clear communication.
Mastering the use of hollow wall anchor bolts and screws empowers you to tackle mounting projects on cavity walls with confidence, ensuring your installations are both secure and durable.
Post time: 4 月-18-2025